Difference between revisions of "Maps"
m (→Old West) |
(→The Southern Bend) |
||
| (26 intermediate revisions by 3 users not shown) | |||
| Line 1: | Line 1: | ||
| − | + | The Maps provided on this page are pretty accurate, although not very detailed. They are meant to present a general lay-out of the four dimensions, without revealing the deeper secrets of the zones - for those you still have to explore. | |
| − | + | There are also some maps available in-game. Those can be found in the Old Yorke Map Shop, The Library of Light in Fenizia, the island Kea in the Greek Archipelago and the Federation Hall on Pleasure Planet. | |
| − | |||
| − | |||
| − | |||
| − | There are also some maps available | ||
In addition to these maps we use the Wilderness Grid for large grid zones. You will mainly find these in Prehistoric (the Sea, the Greek Mainland and the desert of Wawat) and in Future (the Outer Space Grid). If you type MAP in a Wilderness area, it will display a map of 11x11 rooms, with yourself in the centre. The same MAP command in an ordinary room, will only display the exits of that room. | In addition to these maps we use the Wilderness Grid for large grid zones. You will mainly find these in Prehistoric (the Sea, the Greek Mainland and the desert of Wawat) and in Future (the Outer Space Grid). If you type MAP in a Wilderness area, it will display a map of 11x11 rooms, with yourself in the centre. The same MAP command in an ordinary room, will only display the exits of that room. | ||
| − | More maps | + | More maps are added all the time, as the world grows. |
| − | + | == Central Area == | |
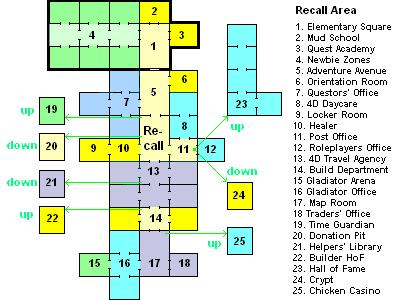
| − | + | === Recall Area === | |
[[File:RecallArea.jpg]] | [[File:RecallArea.jpg]] | ||
| Line 19: | Line 15: | ||
[[#TOP|Back to top]] | [[#TOP|Back to top]] | ||
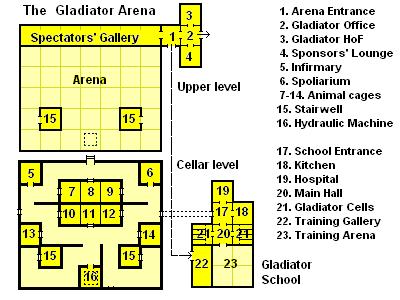
| − | + | === Gladiator Arena === | |
[[File:GladiatorArena.jpg]] | [[File:GladiatorArena.jpg]] | ||
| Line 25: | Line 21: | ||
[[#TOP|Back to top]] | [[#TOP|Back to top]] | ||
| − | + | == Prehistoric == | |
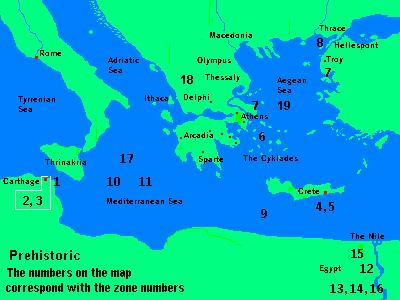
| − | + | === Prehistoric Global === | |
[[File:PrehistoricGlobal.jpg]] | [[File:PrehistoricGlobal.jpg]] | ||
| Line 33: | Line 29: | ||
[[#TOP|Back to top]] | [[#TOP|Back to top]] | ||
| − | + | === Stone Age === | |
| − | [[File:stoneage.jpg]] | + | [[File:stoneage.jpg|400px]] |
[[#TOP|Back to top]] | [[#TOP|Back to top]] | ||
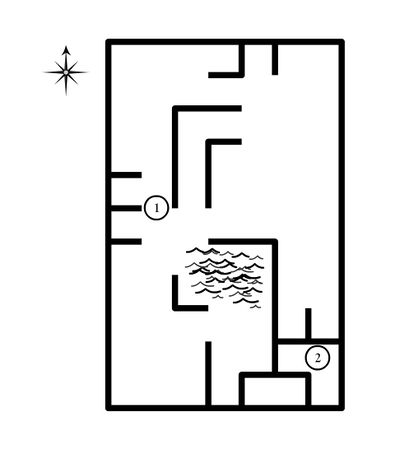
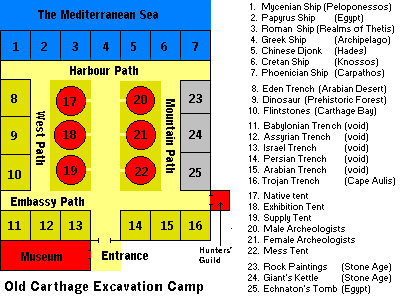
| − | + | === Old Carthage === | |
[[File:Carthage.jpg]] | [[File:Carthage.jpg]] | ||
| Line 45: | Line 41: | ||
[[#TOP|Back to top]] | [[#TOP|Back to top]] | ||
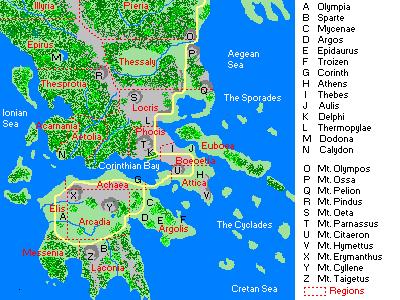
| − | === | + | === Greek Mainland === |
| − | [[File: | + | [[File:GreekMainland.jpg]] |
[[#TOP|Back to top]] | [[#TOP|Back to top]] | ||
| − | === | + | === Aegean Sea === |
| − | [[File: | + | [[File:map_aegeansea.jpg]] |
[[#TOP|Back to top]] | [[#TOP|Back to top]] | ||
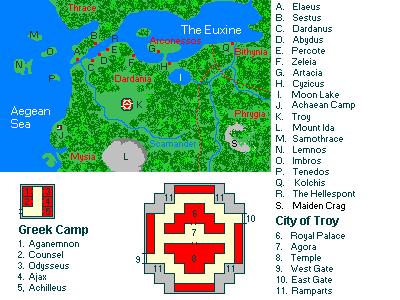
| − | === | + | === Troy and Kolchis === |
| − | [[File: | + | [[File:Troy&Kolchis.jpg]] |
[[#TOP|Back to top]] | [[#TOP|Back to top]] | ||
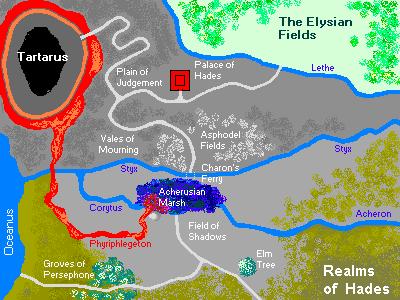
| − | === | + | === Realms of Hades === |
| − | [[File: | + | [[File:RealmsofHades.jpg]] |
[[#TOP|Back to top]] | [[#TOP|Back to top]] | ||
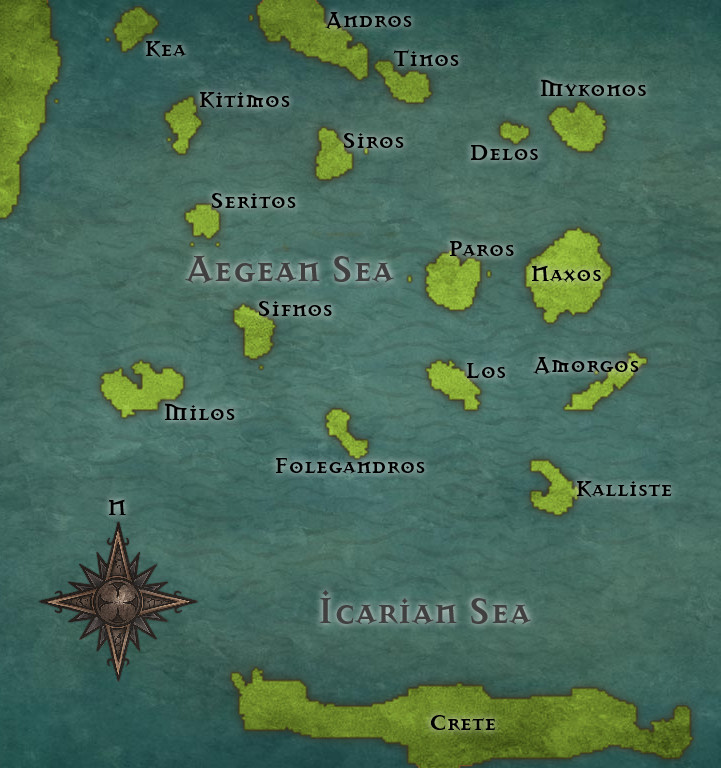
| − | === | + | === The Cyclades === |
| − | [[File: | + | [[File:map_aegeansea.jpg]] |
[[#TOP|Back to top]] | [[#TOP|Back to top]] | ||
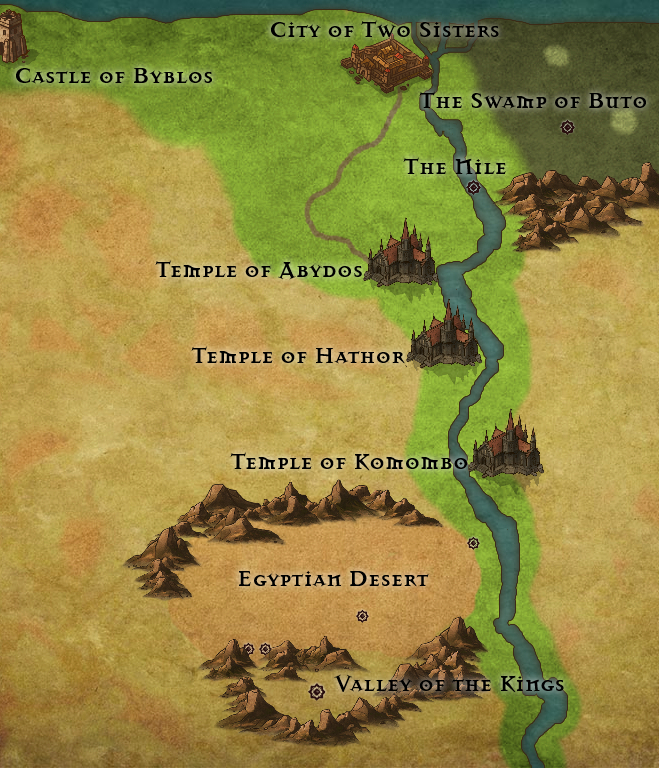
| − | === | + | === Egypt === |
| − | [[File: | + | [[File:map_egypt.png]] |
[[#TOP|Back to top]] | [[#TOP|Back to top]] | ||
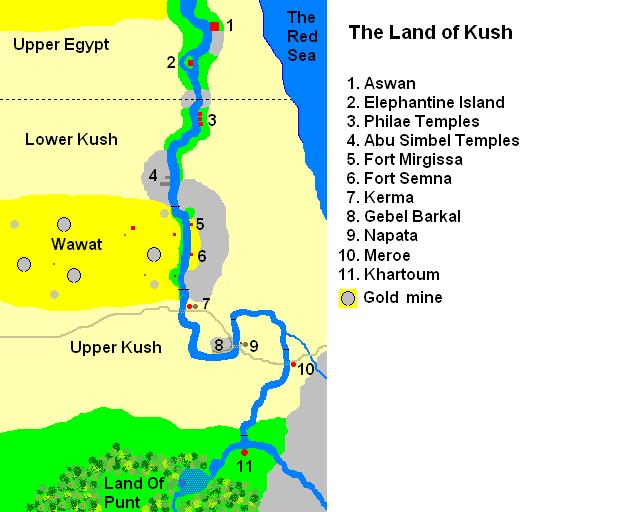
| − | + | === The Land Of Kush === | |
[[File:LandofKush.jpg]] | [[File:LandofKush.jpg]] | ||
| Line 87: | Line 83: | ||
[[#TOP|Back to top]] | [[#TOP|Back to top]] | ||
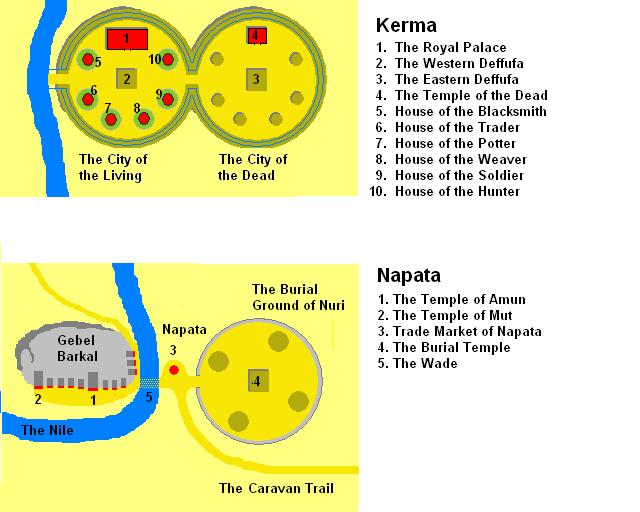
| − | + | === Kerma and Napata === | |
[[File:Kerma&Napata.jpg]] | [[File:Kerma&Napata.jpg]] | ||
| Line 93: | Line 89: | ||
[[#TOP|Back to top]] | [[#TOP|Back to top]] | ||
| − | + | == Medieval == | |
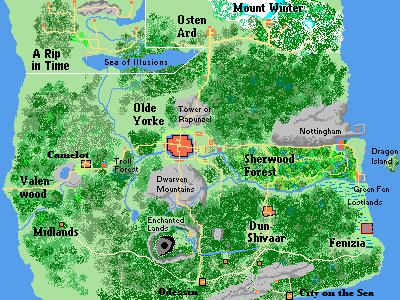
| − | + | === Global Medieval map === | |
| − | [[File: | + | [[File:Medieval_World_Map_2a.png]] |
[[#TOP|Back to top]] | [[#TOP|Back to top]] | ||
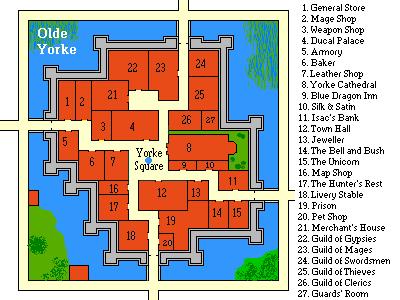
| − | + | ===Olde Yorke === | |
[[File:OldeYorke.jpg]] | [[File:OldeYorke.jpg]] | ||
| Line 107: | Line 103: | ||
[[#TOP|Back to top]] | [[#TOP|Back to top]] | ||
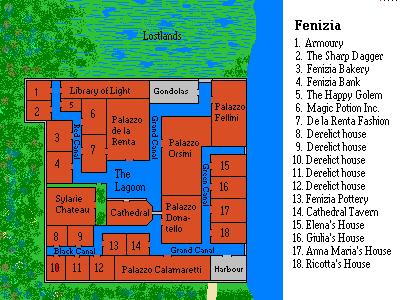
| − | + | === Fenizia === | |
| − | [[File: | + | [[File:Fenizia_2.png]] |
[[#TOP|Back to top]] | [[#TOP|Back to top]] | ||
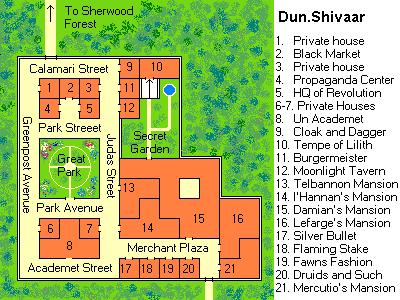
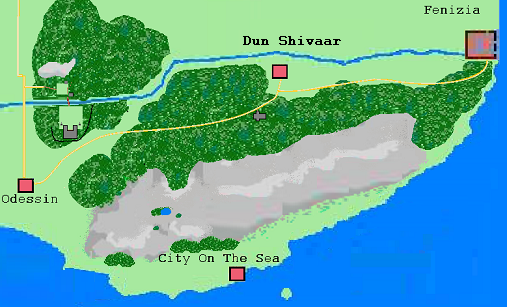
| − | + | === Dun-Shivaar === | |
[[File:DunShivaar.jpg]] | [[File:DunShivaar.jpg]] | ||
| Line 119: | Line 115: | ||
[[#TOP|Back to top]] | [[#TOP|Back to top]] | ||
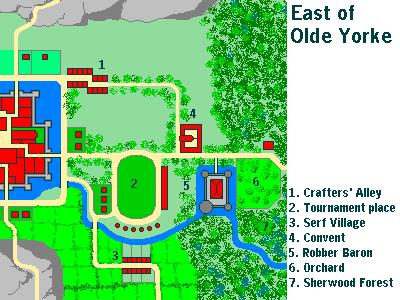
| − | + | === East of Olde Yorke === | |
[[File:EastofOldeYorke.jpg]] | [[File:EastofOldeYorke.jpg]] | ||
| Line 125: | Line 121: | ||
[[#TOP|Back to top]] | [[#TOP|Back to top]] | ||
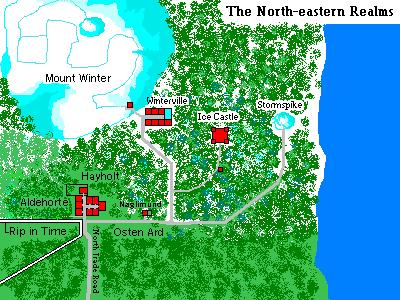
| − | + | === North-Eastern Medieval Realms === | |
[[File:NEMedievalRealms.jpg]] | [[File:NEMedievalRealms.jpg]] | ||
| Line 131: | Line 127: | ||
[[#TOP|Back to top]] | [[#TOP|Back to top]] | ||
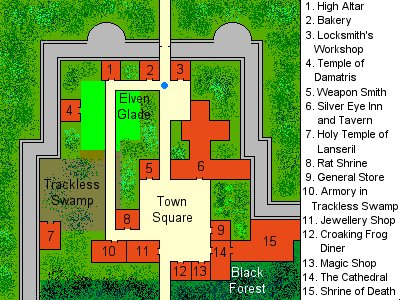
| − | + | === Odessin === | |
[[File:Odessin.jpg]] | [[File:Odessin.jpg]] | ||
| Line 137: | Line 133: | ||
[[#TOP|Back to top]] | [[#TOP|Back to top]] | ||
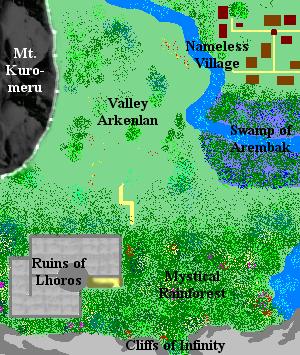
| − | + | === Enchanted Lands === | |
[[File:EnchantedLands.jpg]] | [[File:EnchantedLands.jpg]] | ||
| Line 143: | Line 139: | ||
[[#TOP|Back to top]] | [[#TOP|Back to top]] | ||
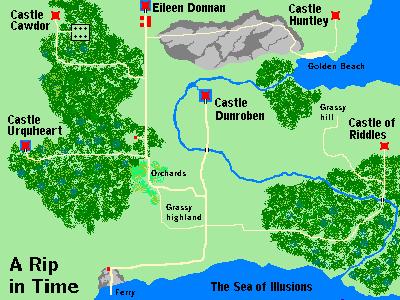
| − | + | === A Rip in Time === | |
[[File:RipInTime.jpg]] | [[File:RipInTime.jpg]] | ||
| Line 149: | Line 145: | ||
[[#TOP|Back to top]] | [[#TOP|Back to top]] | ||
| − | === Old West | + | === The Southern Bend === |
| + | |||
| + | [[File:Southern_Bend_Map_2.png]] | ||
| + | |||
| + | [[#TOP|Back to top]] | ||
| + | |||
| + | == Old West == | ||
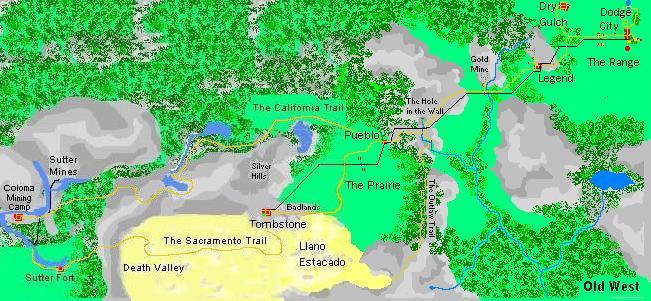
| − | + | === Oldwest Global map === | |
[[File:OldWest.jpg]] | [[File:OldWest.jpg]] | ||
| Line 158: | Line 160: | ||
[[#TOP|Back to top]] | [[#TOP|Back to top]] | ||
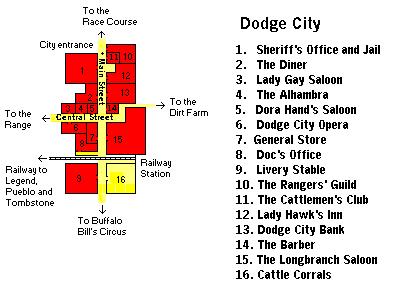
| − | + | === Dodge City === | |
[[File:DodgeCity.jpg]] | [[File:DodgeCity.jpg]] | ||
| Line 164: | Line 166: | ||
[[#TOP|Back to top]] | [[#TOP|Back to top]] | ||
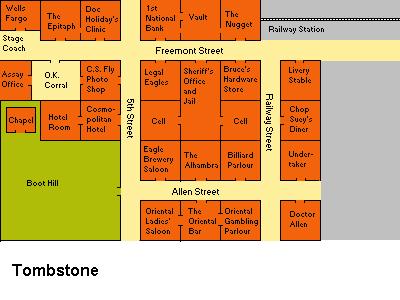
| − | + | === Tombstone === | |
[[File:Tombstone.jpg]] | [[File:Tombstone.jpg]] | ||
| Line 170: | Line 172: | ||
[[#TOP|Back to top]] | [[#TOP|Back to top]] | ||
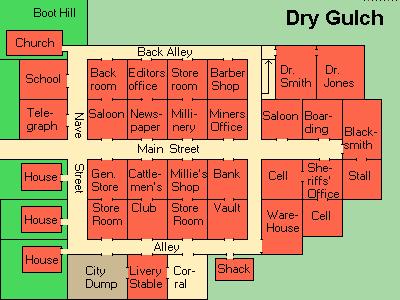
| − | + | === Dry Gulch === | |
[[File:DryGulch.jpg]] | [[File:DryGulch.jpg]] | ||
| Line 176: | Line 178: | ||
[[#TOP|Back to top]] | [[#TOP|Back to top]] | ||
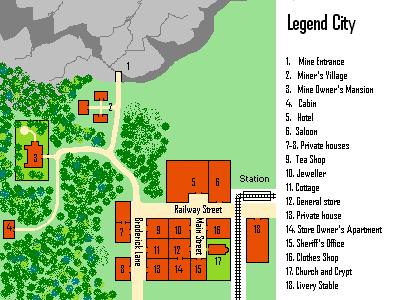
| − | + | === Legend === | |
[[File:Legend.jpg]] | [[File:Legend.jpg]] | ||
| Line 182: | Line 184: | ||
[[#TOP|Back to top]] | [[#TOP|Back to top]] | ||
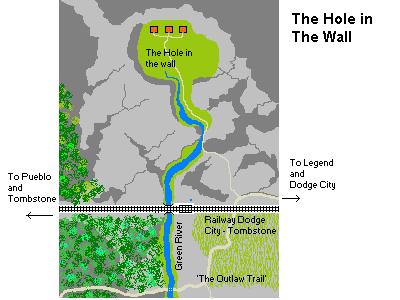
| − | + | === Hole in the Wall === | |
[[File:HoleInTheWall.jpg]] | [[File:HoleInTheWall.jpg]] | ||
| Line 188: | Line 190: | ||
[[#TOP|Back to top]] | [[#TOP|Back to top]] | ||
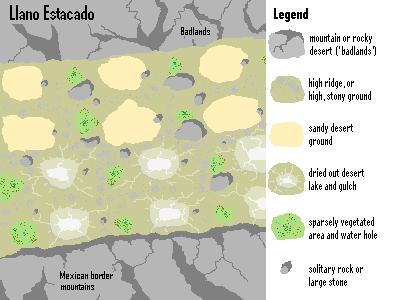
| − | + | === Llano Estacado === | |
[[File:Llano.jpg]] | [[File:Llano.jpg]] | ||
| Line 200: | Line 202: | ||
[[#TOP|Back to top]] | [[#TOP|Back to top]] | ||
| − | |||
| − | |||
| − | |||
| − | |||
| − | |||
| − | + | == Future == | |
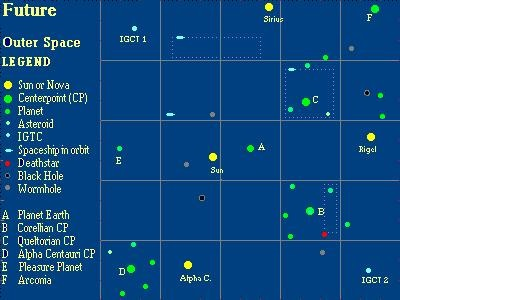
| − | + | === Overall Future Galaxy Map === | |
| − | [[File:Future. | + | [[File:Future - Updated 2020.png]] |
[[#TOP|Back to top]] | [[#TOP|Back to top]] | ||
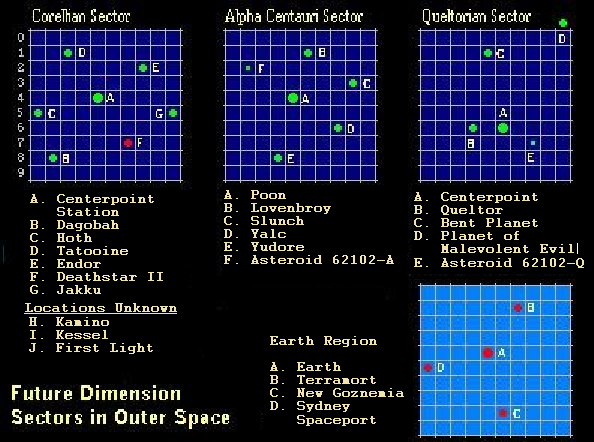
| − | + | === Sectors === | |
| − | [[File:Sectors. | + | [[File:Sectors - Updated 2020.png]] |
[[#TOP|Back to top]] | [[#TOP|Back to top]] | ||
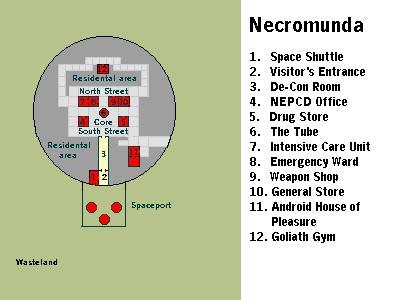
| − | + | === Necromunda === | |
[[File:Necromunda.jpg]] | [[File:Necromunda.jpg]] | ||
| Line 226: | Line 223: | ||
[[#TOP|Back to top]] | [[#TOP|Back to top]] | ||
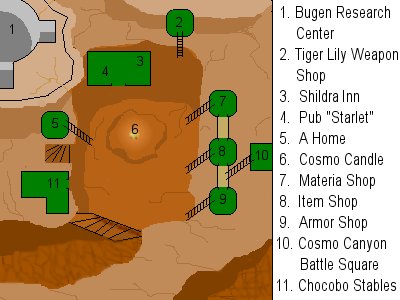
| − | + | === Cosmo Canyon === | |
[[File:CosmoCanyon.jpg]] | [[File:CosmoCanyon.jpg]] | ||
| Line 232: | Line 229: | ||
[[#TOP|Back to top]] | [[#TOP|Back to top]] | ||
| − | + | === Pleasure Planet === | |
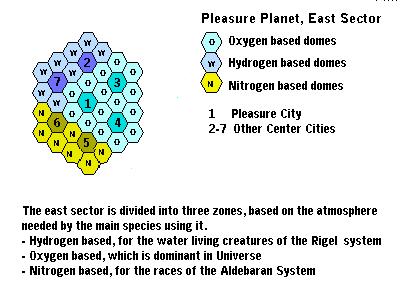
| − | + | ==== Pleasure Planet 1 (oversight) ==== | |
[[File:PleasurePlanet1.jpg]] | [[File:PleasurePlanet1.jpg]] | ||
| Line 240: | Line 237: | ||
[[#TOP|Back to top]] | [[#TOP|Back to top]] | ||
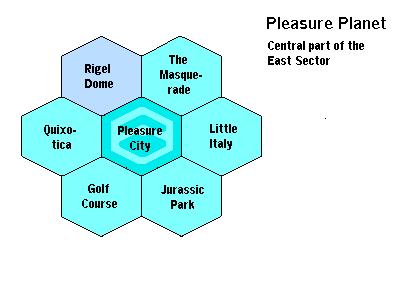
| − | + | ==== Pleasure Planet 2 (central area) ==== | |
[[File:PleasurePlanet2.jpg]] | [[File:PleasurePlanet2.jpg]] | ||
| Line 246: | Line 243: | ||
[[#TOP|Back to top]] | [[#TOP|Back to top]] | ||
| − | + | ==== Pleasure City ==== | |
[[File:PleasureCity.jpg]] | [[File:PleasureCity.jpg]] | ||
| Line 252: | Line 249: | ||
[[#TOP|Back to top]] | [[#TOP|Back to top]] | ||
| − | + | === Alpha Centauri Planets === | |
| − | + | ==== Poon and Yudore ==== | |
[[File:Poon&Yudore.jpg]] | [[File:Poon&Yudore.jpg]] | ||
| Line 260: | Line 257: | ||
[[#TOP|Back to top]] | [[#TOP|Back to top]] | ||
| − | + | ==== Poon Towers ==== | |
[[File:PoonTowers.jpg]] | [[File:PoonTowers.jpg]] | ||
| Line 266: | Line 263: | ||
[[#TOP|Back to top]] | [[#TOP|Back to top]] | ||
| − | + | ==== Lovenbroy and Asteroid ==== | |
[[File:Lovenbroy&Asteroid.jpg]] | [[File:Lovenbroy&Asteroid.jpg]] | ||
| Line 272: | Line 269: | ||
[[#TOP|Back to top]] | [[#TOP|Back to top]] | ||
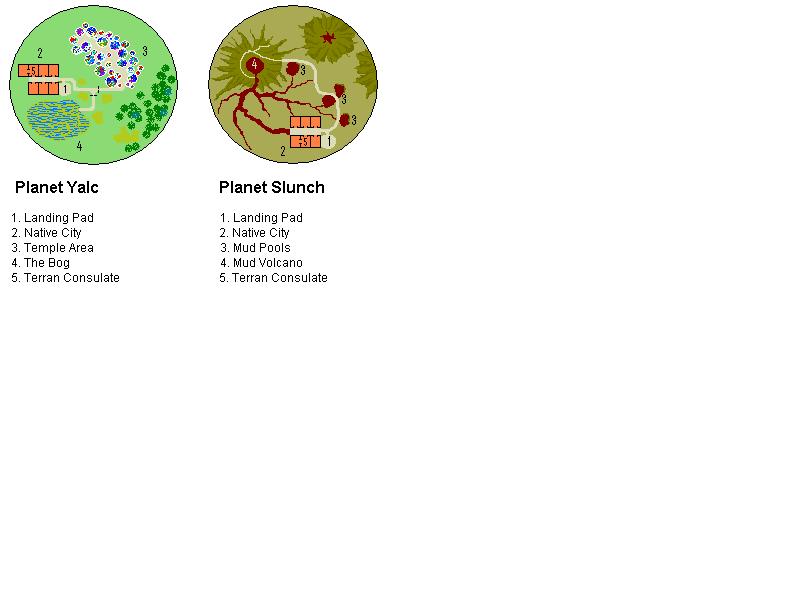
| − | + | ==== Yalc and Slunch ==== | |
[[File:Yalc&Slunch.jpg]] | [[File:Yalc&Slunch.jpg]] | ||
[[#TOP|Back to top]] | [[#TOP|Back to top]] | ||
Latest revision as of 00:28, 11 February 2021
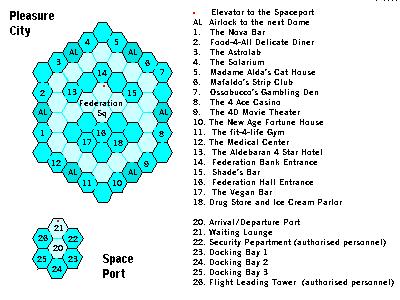
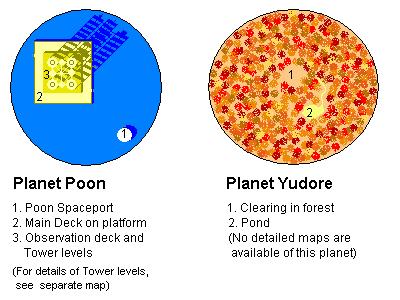
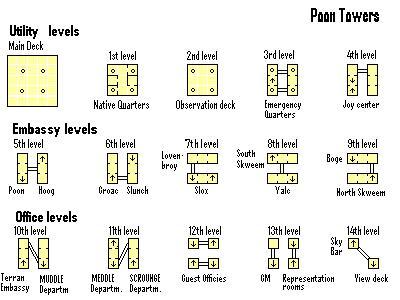
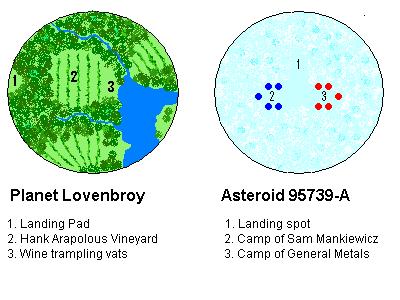
The Maps provided on this page are pretty accurate, although not very detailed. They are meant to present a general lay-out of the four dimensions, without revealing the deeper secrets of the zones - for those you still have to explore.
There are also some maps available in-game. Those can be found in the Old Yorke Map Shop, The Library of Light in Fenizia, the island Kea in the Greek Archipelago and the Federation Hall on Pleasure Planet.
In addition to these maps we use the Wilderness Grid for large grid zones. You will mainly find these in Prehistoric (the Sea, the Greek Mainland and the desert of Wawat) and in Future (the Outer Space Grid). If you type MAP in a Wilderness area, it will display a map of 11x11 rooms, with yourself in the centre. The same MAP command in an ordinary room, will only display the exits of that room.
More maps are added all the time, as the world grows.
Contents
Central Area
Recall Area
Gladiator Arena
Prehistoric
Prehistoric Global
Stone Age
Old Carthage
Greek Mainland
Aegean Sea
Troy and Kolchis
Realms of Hades
The Cyclades
Egypt
The Land Of Kush
Kerma and Napata
Medieval
Global Medieval map
Olde Yorke
Fenizia
Dun-Shivaar
East of Olde Yorke
North-Eastern Medieval Realms
Odessin
Enchanted Lands
A Rip in Time
The Southern Bend
Old West
Oldwest Global map
Dodge City
Tombstone
Dry Gulch
Legend
Hole in the Wall
Llano Estacado
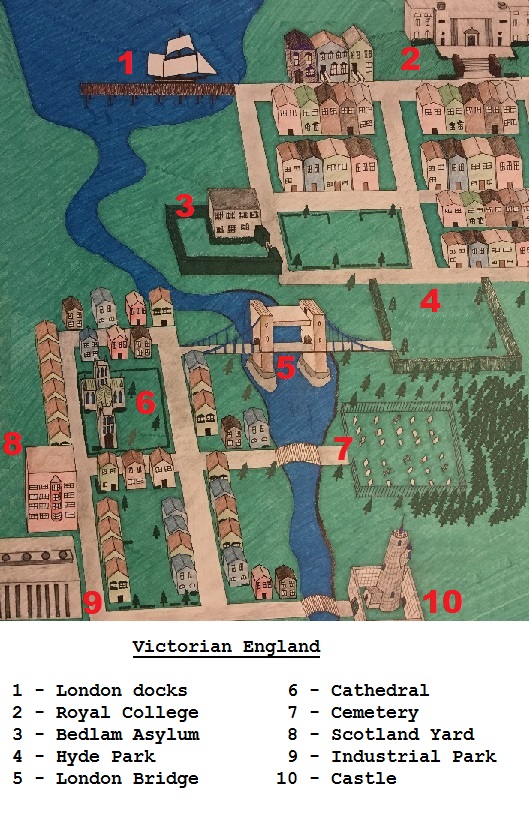
Victorian England
